Can cassette tapes really be building blocks? With a little creativity, YES they can!
For most projects, glue is run on the top, bottom and sides of the cassette tape, but there are a few other areas on the tape that you should be aware of when building.
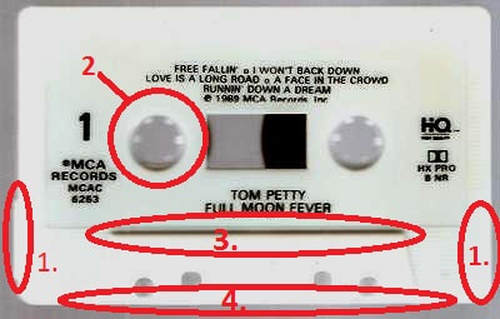
1. Side groove- This groove is on the bottom of both the left and the right sides. When two side grooves are against each other, the tapes can't get too close together. If placing two cassettes next to each other, one tape should be right side up and the other should be upside down to fit closest to each other.
2. Sprocket- Makes a great window/peephole, and is also a good place to attach zip ties to connect two tapes together.
3. Bottom Groove- This is like a long, raised platform on the bottom of the cassette. This part is a good holder for cards, etc.
For most projects, glue is run on the top, bottom and sides of the cassette tape, but there are a few other areas on the tape that you should be aware of when building.
1. Side groove- This groove is on the bottom of both the left and the right sides. When two side grooves are against each other, the tapes can't get too close together. If placing two cassettes next to each other, one tape should be right side up and the other should be upside down to fit closest to each other.
2. Sprocket- Makes a great window/peephole, and is also a good place to attach zip ties to connect two tapes together.
3. Bottom Groove- This is like a long, raised platform on the bottom of the cassette. This part is a good holder for cards, etc.
 RSS Feed
